Thứ Sáu, 4 tháng 12, 2015

thumbnail

Orchid Flower

Nguồn http://suviscrochet.blogspot.com/2014/04/orchid-young.html

Young Orchid Flower, Buds, and Branches


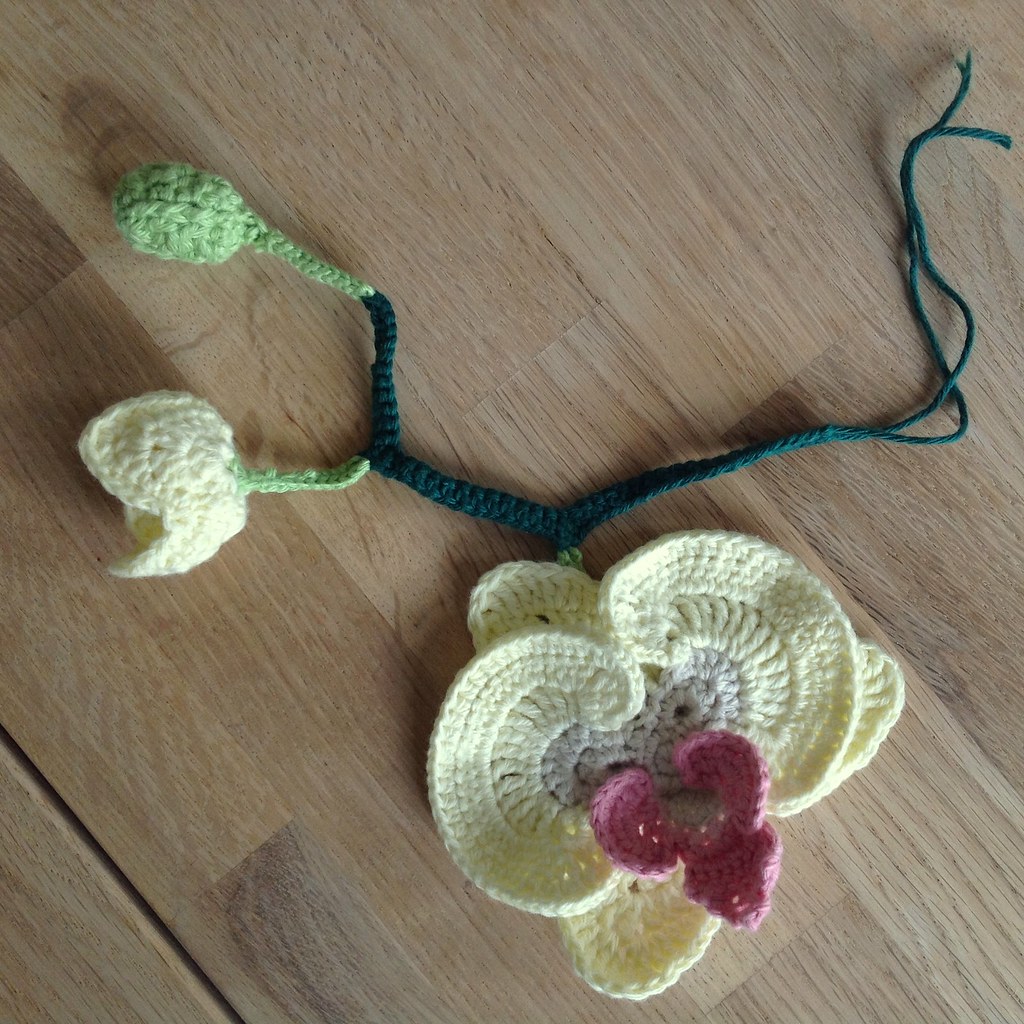
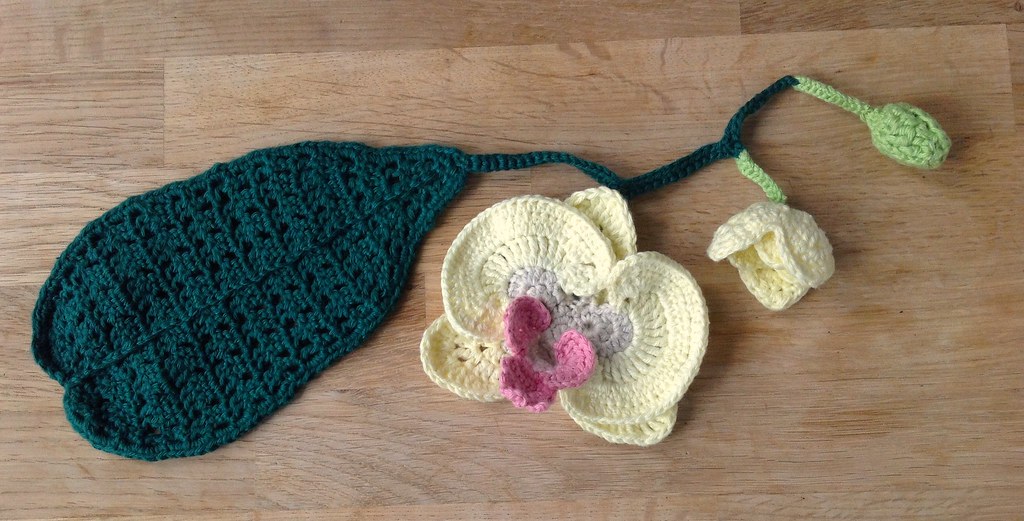
When I crochet something from nature, I like to make it as realistic as possible. I rarely see a single orchid flower on a stem with a single leaf. So, to complete your Phaleonopsis orchid project, here are a young, newly opening orchid flower and two flower buds that are still developing, and a pattern to attach all the pieces together on a branch.


Here is the pattern for the Mature Orchid Flower.
Here is the pattern for the Orchid Leaf.


    This pattern special stitches:
      Even Increase (Even Inc) = When there are four stitches to increase over, then [dc in the first stitch, dc2tog over the 1st and 2nd stitches, dc in the 2nd stitch].
    Disclaimer:
    In this pattern, 2 sc = 2 sc in the next st
       sc 2 = sc in each of the next 2 sts


    Young Flower:
    Foundation:
    Row 1:  6 sc in a magic circle.
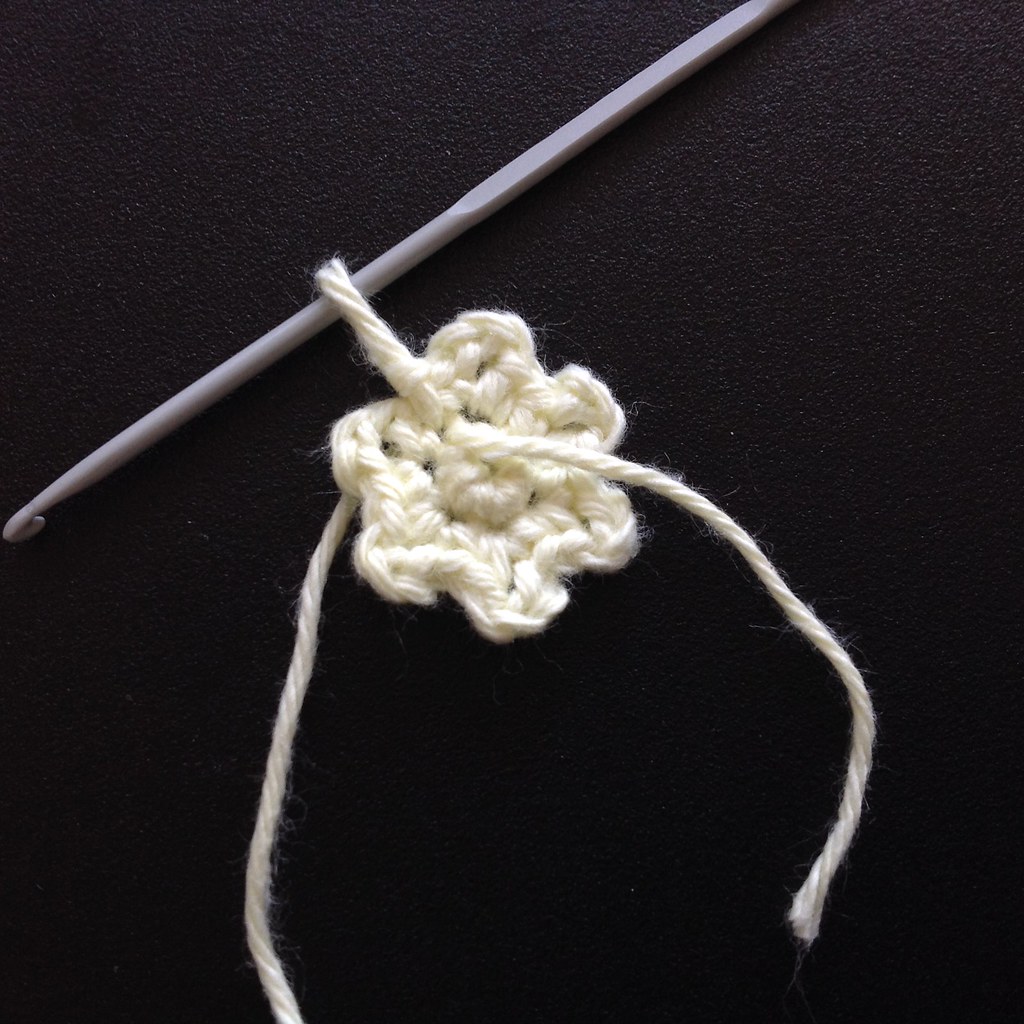
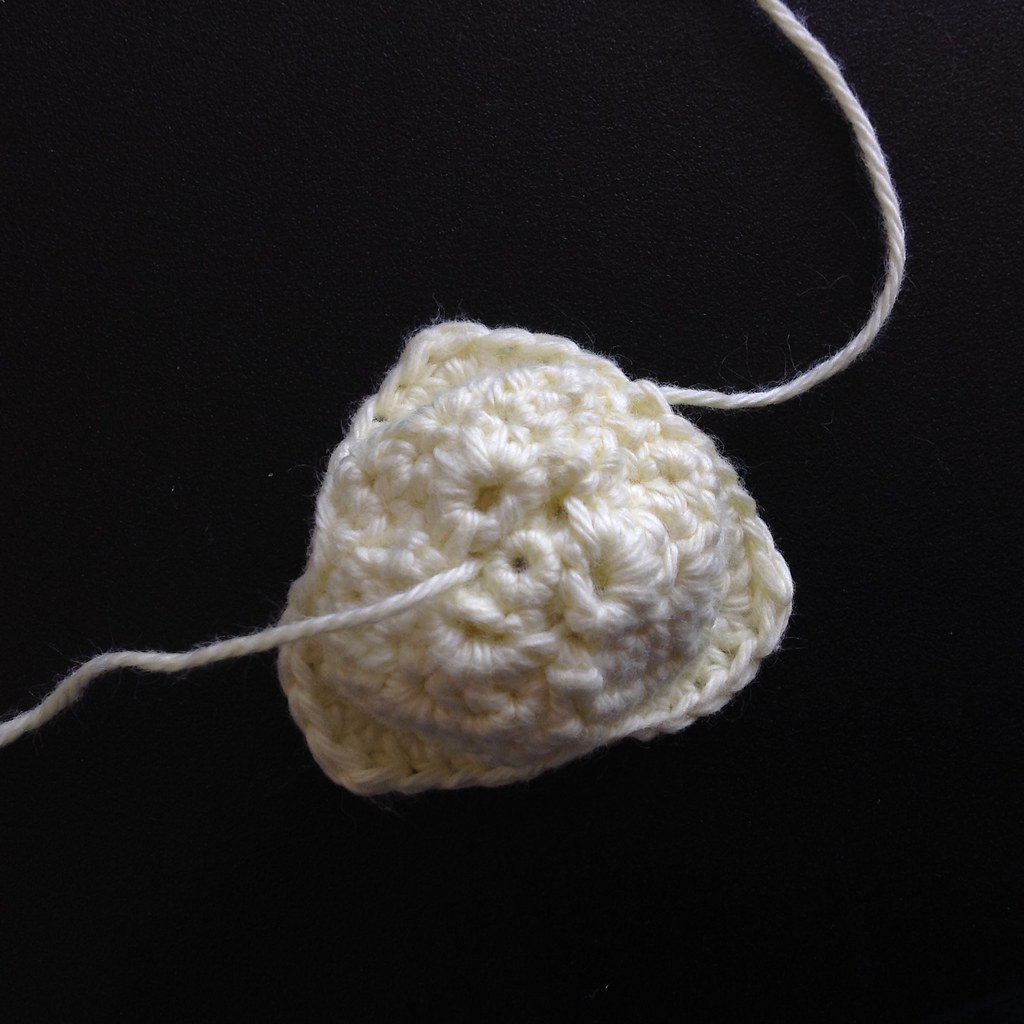
    Row 2:  In the front loops only, [(sc, ch 3, sc) in the first sc] repeat 6 times, sl st with the first st (Fig. 1).
    Inner Petals:
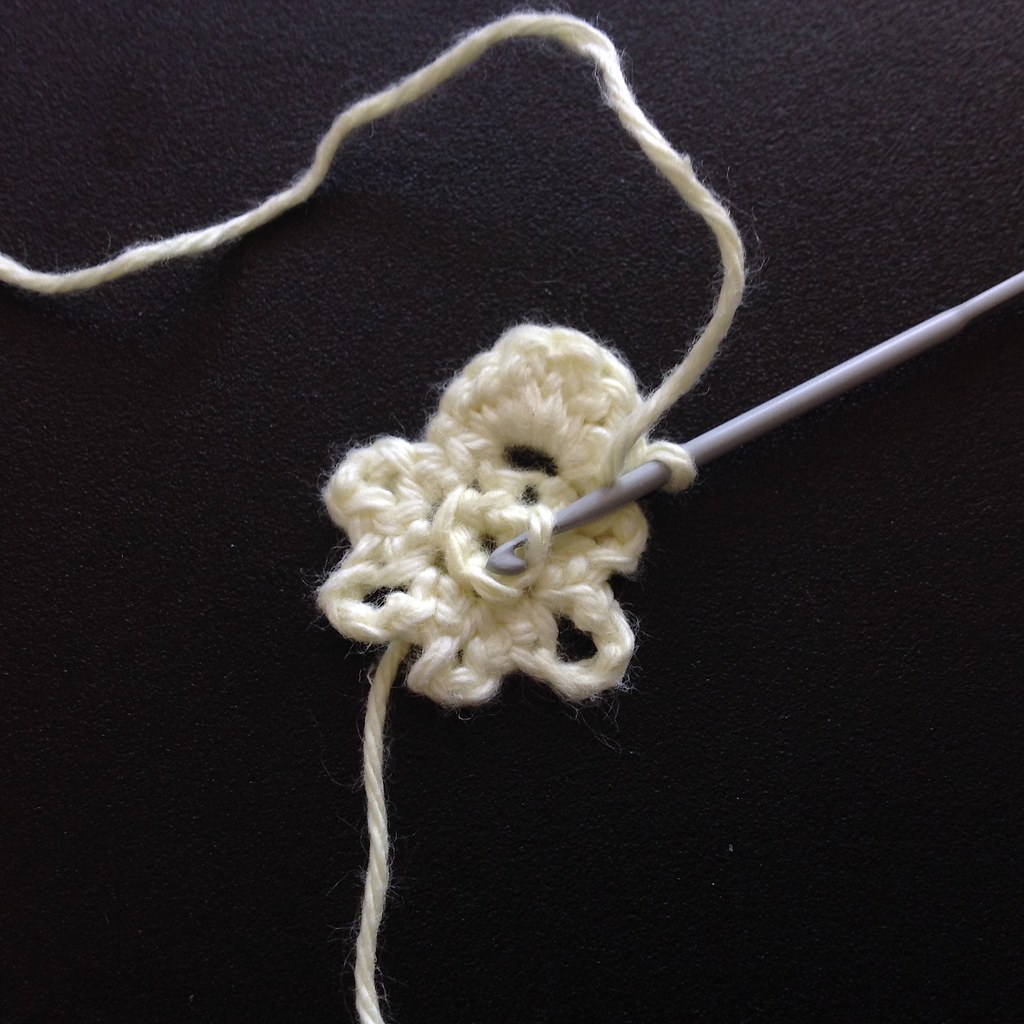
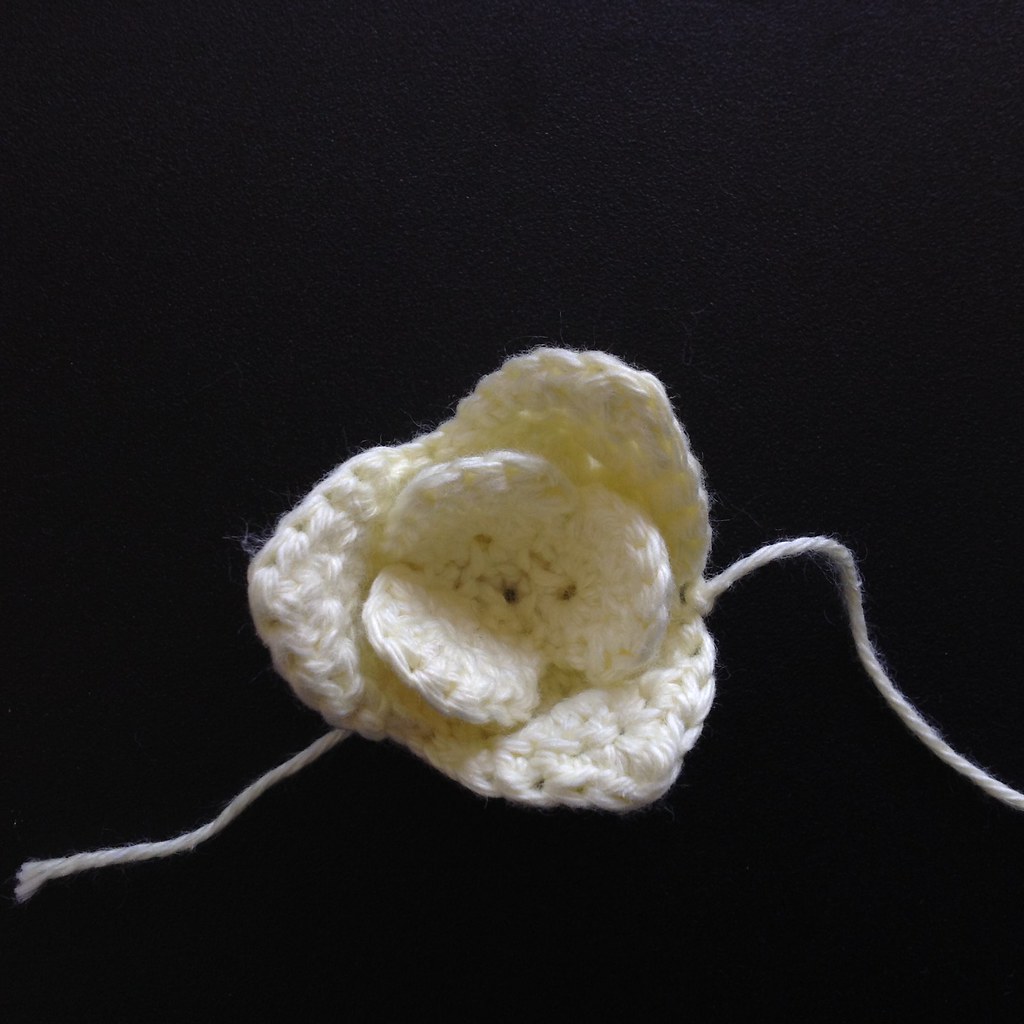
    Row 3:  Ch, [(sc, hdc, dc 3, hdc, sc) in ch-3 loop, skip next ch-3 loop, sl st in back loop of the first st (Fig. 2)] repeat 3 times.
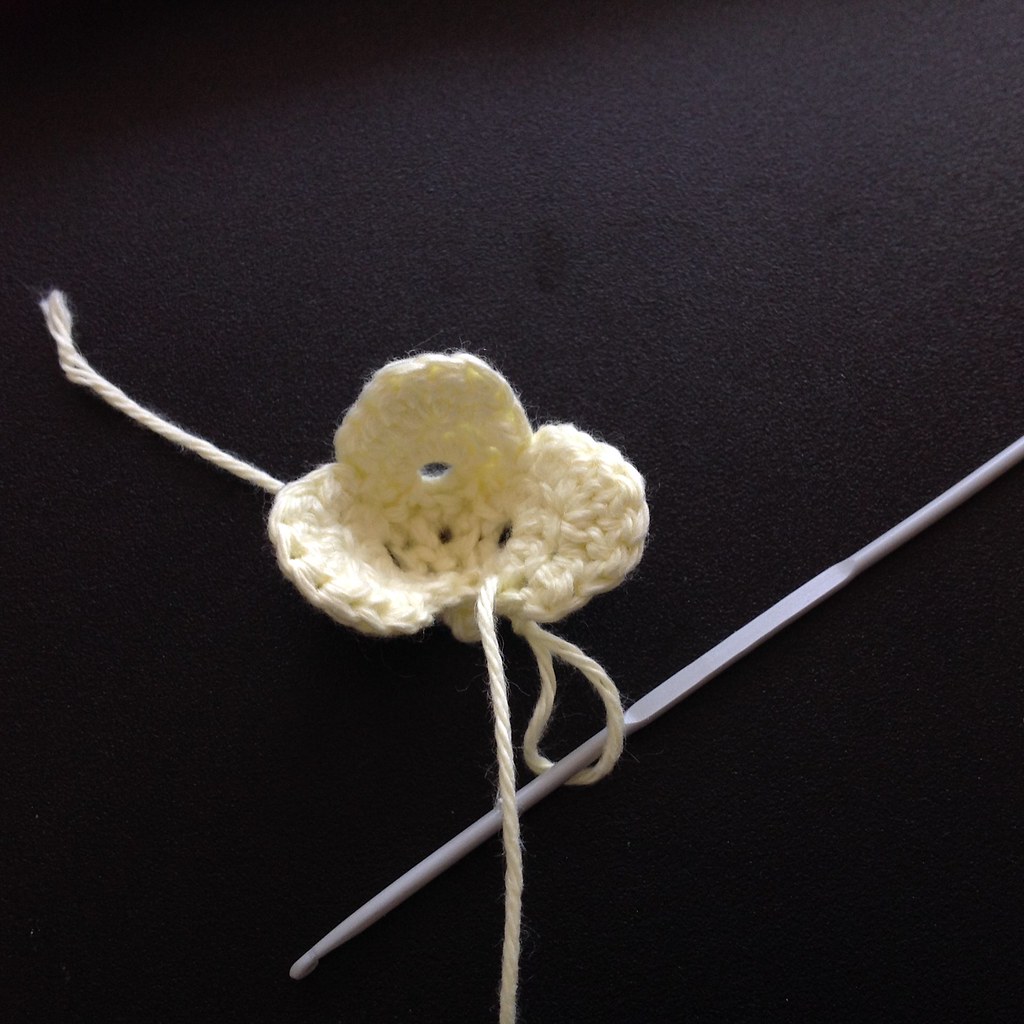
    Row 4:  Skip the first ch. Sl st, [sl st, ch, 2 hdc, 4 dc, 2 hdc, ch, sl st, skip next 3 sts] repeat 3 times along the inner petals, sl st in next st. Continue to the Outer Petals (Fig. 3).
    Outer Petals:
    Row 5:  Ch 2, [(sc, hdc, dc 3, hdc, sc) in ch-3 loop] repeat 3 times around.
    Row 6:  Skip the ch, [sl st, 2 sc, 2 hdc, (2 dc, ch, 2 dc) in middle st, 2 hdc, 2 sc, sl st] repeat 3 times.
    Row 7:  [Skip first sl st and sc. Sc 3, hdc, dc, 3 dc in ch-space, dc, hdc, sc 3, skip last sc and sl st] repeat 3 times.
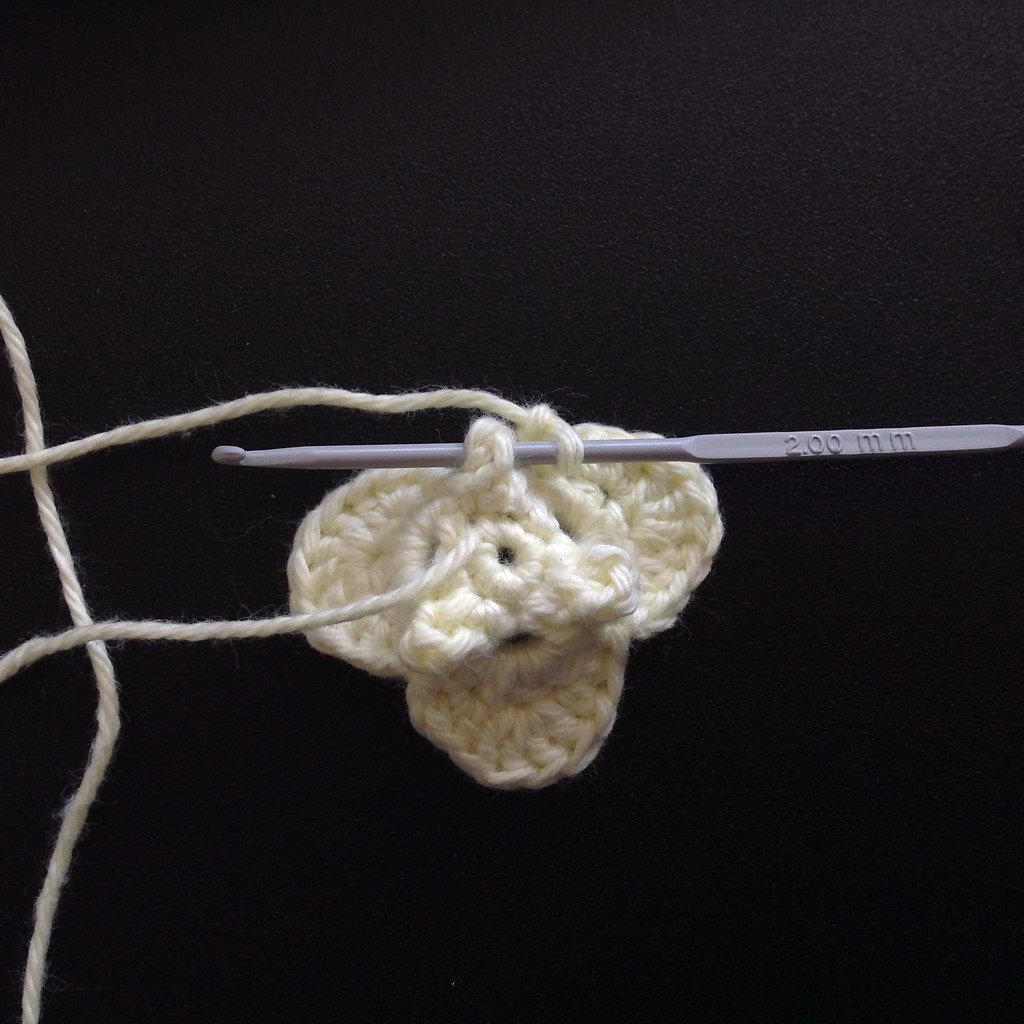
    Row 8:  [Skip first sc. Sl st 2, sc 2, hdc, (hdc, dc, hdc), hdc, sc 2, sl st 2, skip last sc] repeat 3 times, skip next 2 sts, sl st (Fig. 4).
       Tie off. Weave ends in.

    Large Flower Bud:
    Row 1:  6 sc in a magic circle.
    Row 2:  In the back loops only. 2 sc in each sc around.
    Row 3:  Ch 2, [2 hdc in the next st, hdc 2] repeat 3 times, 2 hdc, hdc, sl st with the first st.
    Row 4:  Ch 2, [fpdc, dc, Even Inc, dc] repeat 3 times, sl st with the first st.
    Row 5:  Ch 2, [fpdc, dc 2, bpdc, dc 2] repeat 3 times, sl st with the first st.
    Row 6:  Ch 2, [fpdc, dc 2, bpdc, dc 2] repeat 3 times, sl st with the first st.
    Row 7:  Ch 2, [fpdc, dc2tog, bpdc, dc2tog] repeat 3 times, sl st with the first st.
       Stuff lightly.
    Row 8:  Ch 2, [fpdc, dc3tog] repeat 3 times, sl st with the first st.
       Tie off. Weave ends in.

    Small Flower Bud:
    Row 1:  6 sc in a magic circle.
    Row 2:  In the back loops only. 2 sc in each sc around.
    Row 3:  Ch 2, hdc around, sl st with the first hdc.
    Row 4:  Ch 2, [fpdc, dc, bpdc, dc] repeat 3 times, sl st with the first st.
    Row 5:  Ch 2, [fpdc, dc, bpdc, dc] repeat 3 times, sl st with the first st.
       Stuff lightly.
    Row 6:  Ch 2, [fpdc, dc3tog] repeat 3 times, sl st with the first st.
       Tie off. Weave ends in.

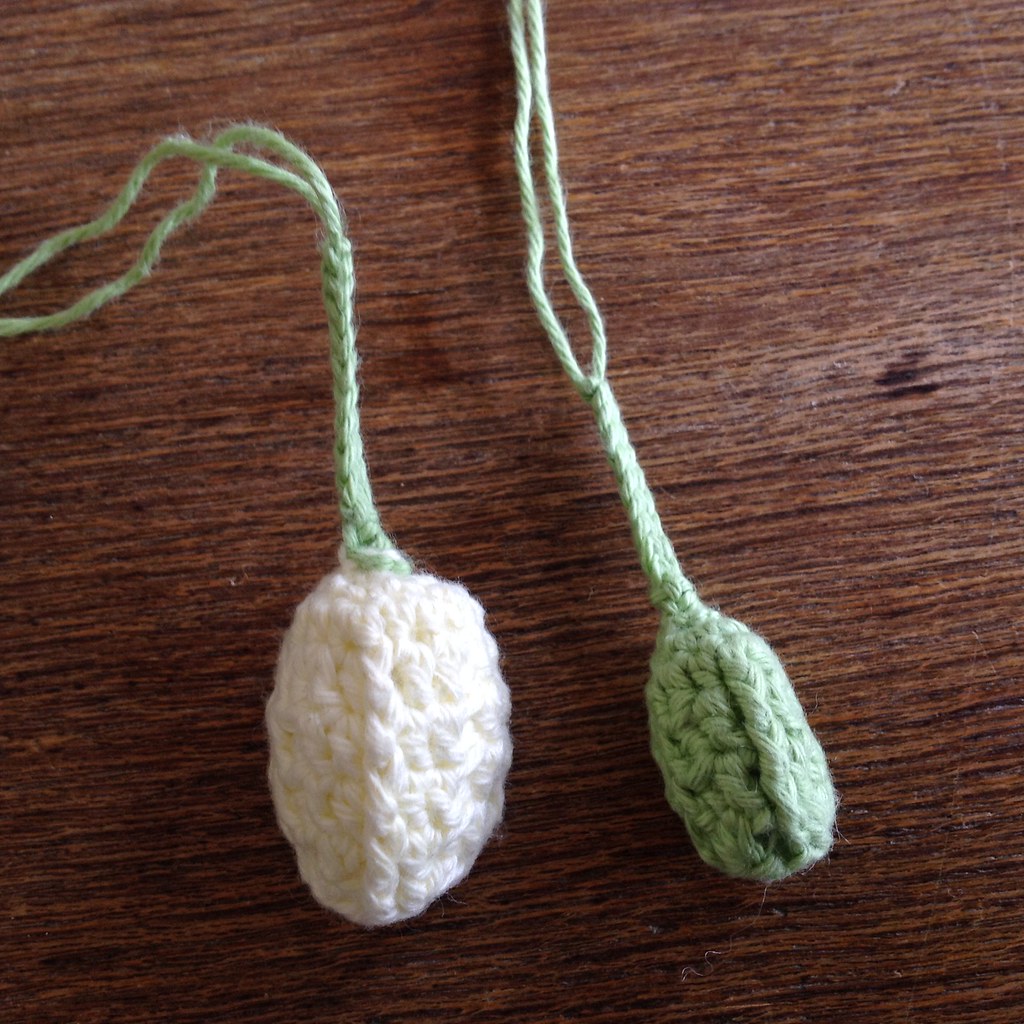
       You now have two developing flower buds to complete your orchid branch (Fig. 5).

    Stems:
    Young Flower and Buds:
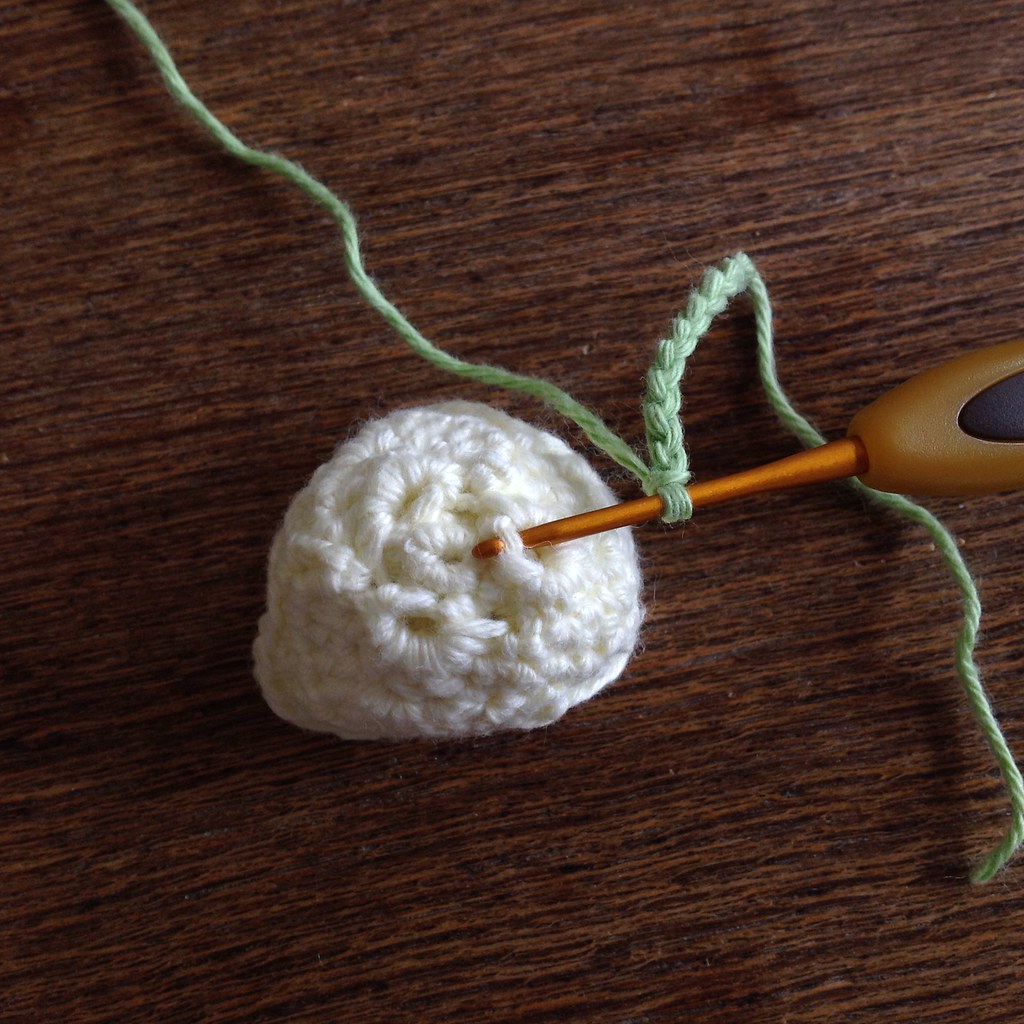
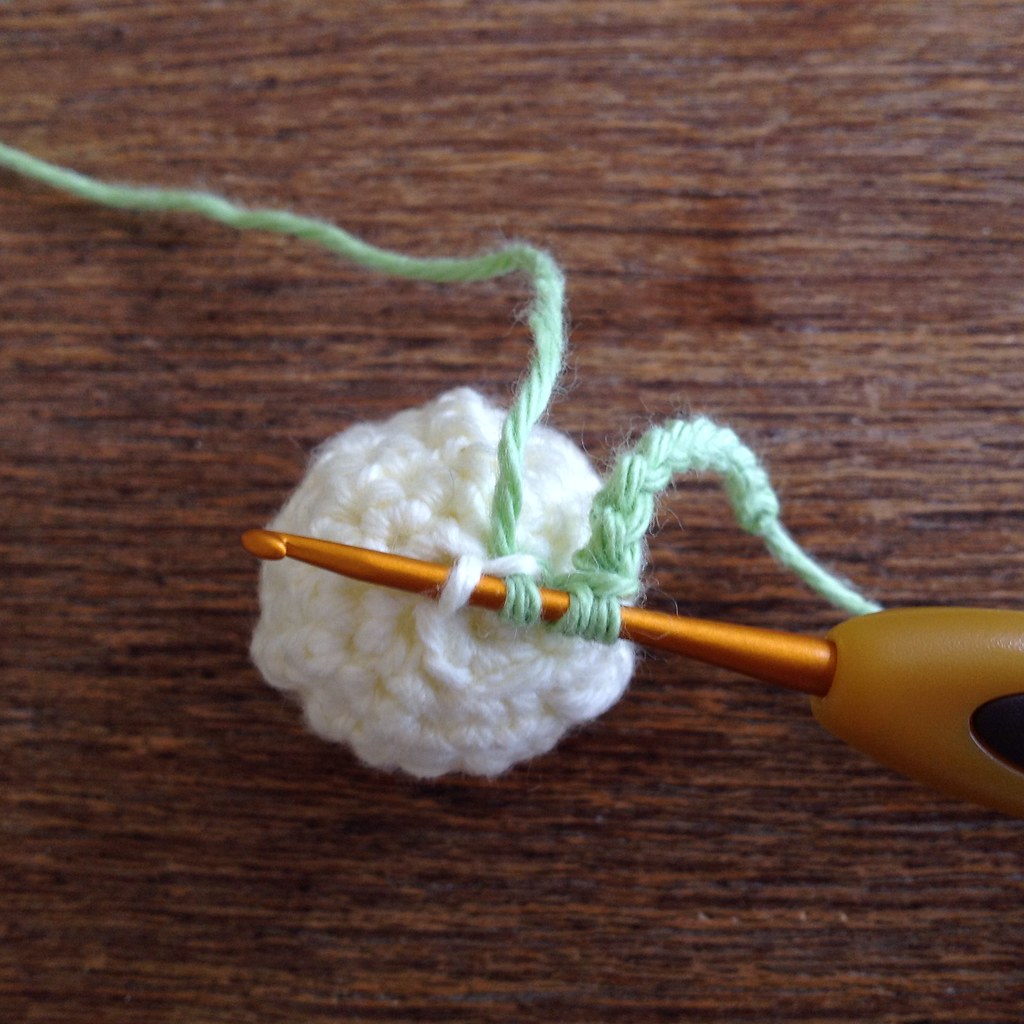
    Ch 10, sc6tog around the exposed loops on the flower/bud (Fig. 6), sl st 9 along the chain.
       Tie off. Weave ends in.
    Mature Orchid:
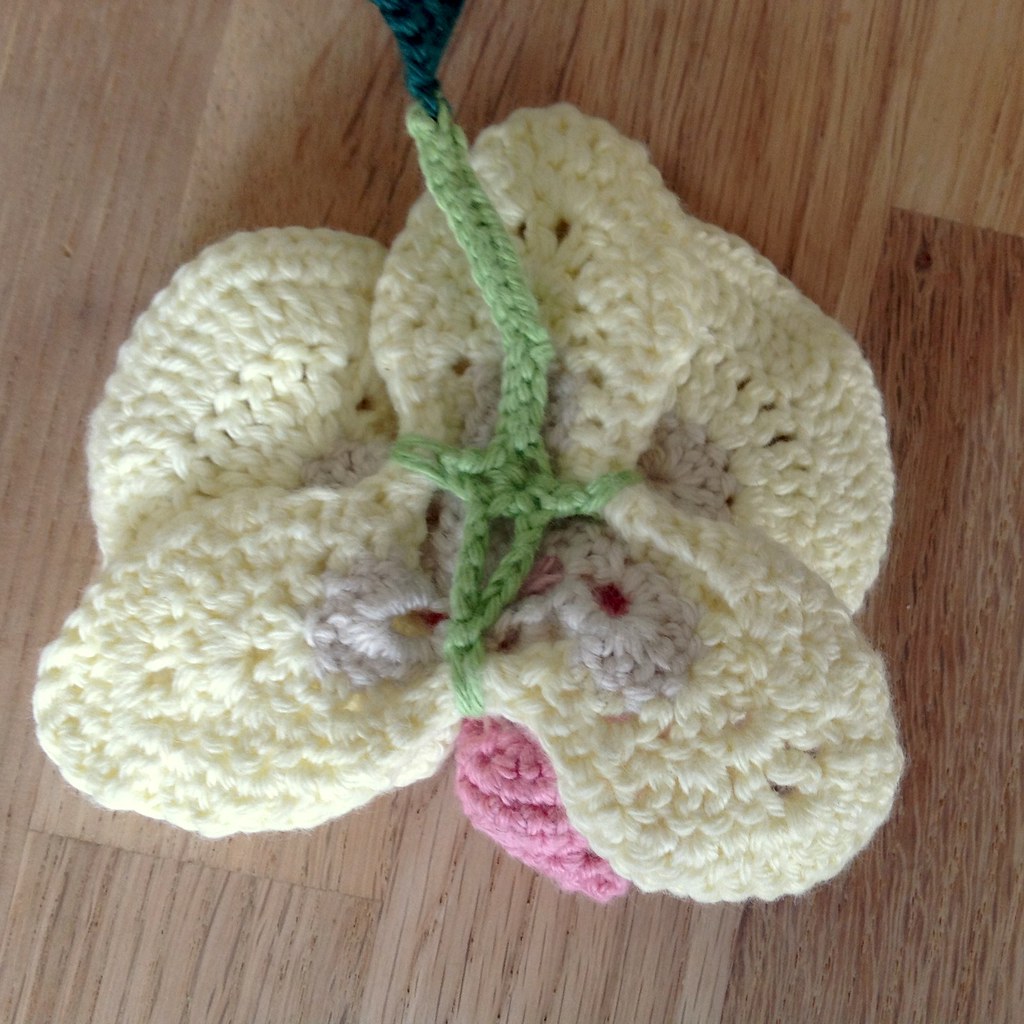
    Ch 19, sl st in the 4th ch from the hook, ch, sc in side ch-3 support of the flower, ch, sc in ch-4 loop, ch 5, sc in bottom ch-3 support, ch 5, sc in ch-4 loop, ch, sc in side ch-3 support, ch, sc in ch-4 loop, sl st 5 along beginning ch, sl st into a central loop of the top rear petal, sl st 10 along beginning ch (Fig. 7).
       Tie off. Weave ends in.

    Branch:
    Ch 16, sc into stem of orchid, ch 14, sc into stem of baby flower, ch 12, sc into stem of bud, turn.
    Sl st in second ch from hook, sl st 4, sc 6, sc3tog, sc 12, sc3tog, sc 15.
       Tie off. Use a needle to attach to the base of the leaf. Weave ends in.


    Fig. 1:   Young Flower Foundation


    Fig. 2:   First inner petal complete. Slip stitch in the front loop in the center of the flower foundation.


    Fig. 3:   Top: Three inner flower petals complete. Bottom: Continue directly to the outer petals.


    Fig. 4:   Completed Young Orchid Flower.


    Fig. 5:   Completed Flower Buds.


    Fig. 6:   Sc into exposed back loops of the young flower (left) and buds (right) to attach a stem.


    Fig. 7:   Sc around the ch-3 supports of the mature orchid to attach a stem.


    Phaleonopsis orchid branch with leaf, flower, baby flower, and bud.

    Thứ Hai, 30 tháng 11, 2015

    thumbnail

    Blog hay quá.

    http://crochet-plaisir.over-blog.com/

    http://crochet-plaisir.over-blog.com/tag/noel%20%20-%20paques%20%20-%20halloween/

    http://crochet-plaisir.over-blog.com/tag/fleurs%20%26%20%20applications/

    http://crochet-plaisir.over-blog.com/tag/animaux/

    http://www.oficinadobarrado.blogspot.com.br/2010/11/croche-pap-noel-azul.html
    thumbnail

    Mẫu móc cây thông dẹt

    Top Section

    Row 1. To begin Ch 2, work 2 dc into the 2nd ch from hook, ch 1 turn. (2)
    Crochet Christmas tree pattern and tutorial: image of first row of crochet xmas tree
                                    (pull the tail end to tighten and neaten the slip knot)

    Row 2. Work 2 dc into each of the dc st from previous row , ch 1 turn   (4)
    Crochet Christmas tree pattern and tutorial: image of second row worked of xmas tree

    Row 3. Work 2 dc into the first st, dc, dc, 2 dc in the last st, ch 1 turn    (6)
    Rows 4 - 7. Work 2 dc into the first and last sts, and a single dc in each st along the row until you have 14 sts, ch 1 turn. Work 5 sl sts along, ch 1.
    Crochet Christmas tree pattern and tutorial: image of top section of crochet tree complete

    Middle Section

    Row 1. Work a dc in each of the next 4 sts, ch 1 turn. (4)
    Rows 2 - 7. Always work 2 dc in first and last sts, with single dc sts in between them. Each row will increase by two sts, until you end up with 16 sts on the 7th row, ch 1 turn, work 5 sl sts along, ch 1.
    Crochet Christmas tree pattern and tutorial: image of middle section of crochet xmas tree complete

    Third Section

    Row 1. Work a dc in the next 6 sts, ch 1 turn. (6)

    Crochet Christmas tree pattern and tutorial: image of 2 dc increase

    Rows 2 - 7 Same as the middle section work 2 dc in the first and last sts, with 1 dc worked in each st along. You will end up with 18 sts on Row 7, ch 1 turn, work 7 sl sts along, ch 1.
    Crochet Christmas tree pattern and tutorial: image of complete crochet tree, starting to work the pot/base section

    Base

    *Work 1 dc into the next 4 sts, ch 1 turn*. Work * to * another 3 times. Fasten off.

    Crochet Christmas tree pattern and tutorial: image of crocheted Xmas tree section complete

    Decorative Edging

    Thread six metallic balls onto the yarn, then attach the yarn to the hook with a slip knot. (I had to cut my yarn to size for this part, and thread them all the way to the end - the metallic bells kept snagging and fraying the yarn whilst they were on the thread waiting to be worked in.  I was really surprised at how much yarn I used to outline the tree. I measured the yarn from my fingers to my elbow then worked this length another eight times before I snipped the yarn - it measured about 125 inches/ 317.5 cms - so do it this way if you have the same problem).

    With right side facing you make a sl st just underneath the point of the bottom section of the tree, position the first bell right up to the hook, but out of the way whilst you make a dc in next st (see below)
    Crochet Christmas tree pattern and tutorial: image of crocheted snowy like border and first bauble worked onto tree

    Always work 2 dc in the same st at each corner (this is a little tricky on some of the points - just work the corner where your hook can squeeze into). Work 1 dc in each space along till you get to the turning point to start the next section of the tree (see photo below).
    Crochet Christmas tree pattern and tutorial: image of crocheted snowy border being worked and baubles added
    I found that working a sl st before starting the next section of the tree reduced the bulk of yarn between each section - it just looked better on mine. It's not exact so try this with yours and see if it makes any difference.

    Crochet Christmas tree pattern and tutorial: image of positioning the bauble before crocheting the next stitch
    The picture above shows where I've positioned the 'bauble' before making the next stitch. I found the best place to work them is just under the pointed section. If you attach them on the point of the tree they stick out horizontally from the branch, and don't dangle properly.

    When you get to the top point of the tree work a dc, tr, ch 15 (for the hanging loop) sl st into top of tr to secure loop, dc all in the same stitch. (You may need to reduce or increase the amount of chains according to the thickness of your yarn for the hanging loop). Continue in the same way down for the other side of the tree. Finish with a sl st after the final bauble has been added. Fasten off and weave in ends.

    Block

    Crochet Christmas tree pattern and tutorial: image of crochet xmas trees being blocked

    With the wrong side facing you, pin the motif  onto a foam pad covered with an old towel. Pin and stretch each point into place, then with a brush spread some PVA glue all over the main tree and pot sections, making sure you work the glue all the way to the points to stiffen and strengthen the motif. Make sure they are completely dry before you unpin them.

    Crochet Christmas tree pattern and tutorial: image of completed crochet xmas tree
    You could pop them on a home-made Xmas card, decorate the Xmas tree, string them together to make a Xmas garland, or stitch one onto a stocking - just a few suggestions! I'm going to make a larger one to hang from the rear view mirror in the car which I'll share with you soon.

    If you do decide to incorporate them into your own designs then I would really appreciate that you link them back to me as the original designer.

    I really hope you have lots of festive fun making these. I'd love to hear your feedback on this - your comments are very much appreciated.

    Thứ Năm, 19 tháng 11, 2015

    thumbnail

    Móc cây thông- Mẫu 2

    Nguồn: http://littleabbeepatterns.blogspot.com/2014/11/o-crochet-christmas-tree-crochet.html

    O' Crochet Christmas Tree! Crochet TUTORIAL


    It is that time of year to start thinking of Christmas, and Christmas presents...

    Thinking of handmade gifts?

    A Chrismas tree maybe?

    Well, it so happens that I have a tutorial for you today!  So lets get started!

    Materials Needed:

    -Worsted Weight #4 Yarn.  I used 100% cotton yarn, but acrylic yarn will work well too.
    -Crochet Hook Size: E/4-3.50MM
    -Sharp Needle for sewing pieces together
    -Scissors
    -Stuffing
    -Safety Pin for marking your Rnds
    -Cardboard

    Abbreviations:

    Click here for a list of abbreviations.

    Special Stitches:

    Beginning Crocodile Stitch: ch 3, (counts as the first dc),


    work 5 more dc around the post of the next st,


     ch 3,


     sl st in the 3rd ch from the hook,


     work 6 dc around the post of the next st (beginning crocodile stitch made)


    Crocodile Stitch: work 6 dc around the post of the next dc, ch 3, sl st in the 3rd ch from the hook, work 6 dc around the post of the next st (crocodile stitch made)

    Notes:

    The gauge doesn't matter so much for this pattern because you aren't making an article of clothing that needs to fit someone.  I do tend to crochet very tight (tighter than normal) when I am making amigurumi so that the stuffing doesn't show through.  But, if you want your tree to measure the same as mine, here is the gauge:

    4 sts and 4 rows = 1"

    Finished Measurement: 10.5" tall, and 5.5" in diameter.

    Instructions:

    With green yarn, make a magic loop, ch 1;

    Rnd 1: 6 sc in the loop (6 sc)

    Pull on the tail end to tighten up the loop.  Put your safety pin or stitch marker in the first st you made in rnd 1 and move it up as you crochet to mark your rnds.

    Rnd 2: sc in each st around (6 sc)

    Rnd 3: (2 sc in the next st, sc in the next st) repeat around (9 sc)

    Rnd 4: sc in each st around (9 sc)

    Rnd 5: (2 sc in the next st, sc in the next 2 sts) repeat around (12 sc)

    Rnd 6: sc in each st around (12 sc)

    Rnd 7: (2 sc in the next st, sc in the next 3 sts) repeat around (15 sc)

    Rnd 8: sc in each st around (15 sc)

    Rnd 9: (2 sc in the next st, st in the next 4 sts) repeat around (18 sc)

    Rnd 10: sc in each st around (18 sc)

    Rnd 11: (2 sc in the next st, sc in the next 5 sts, repeat around (21 sc)

    Rnd 12: sc in each st around (21 sc)

    Rnd 13: (2 sc in the next st, sc in the next 6 sts) repeat around (24 sc)

    Rnd 14: sc in each st around (24 sc)

    Rnd 15: (2 sc in the next st, sc in the next 7 sts) repeat around (27 sc)

    Rnd 16: sc in each st around (27 sc)

    Rnd 17: (2 sc in the next st, sc in the next 8 sts) repeat around (30 sc)

    Rnd 18: sc in each st around (30 sc)

    Rnd 19: (2 sc in the next st, sc in the next 9 sts) repeat around (33 sc)

    Rnd 20: sc in each st around (33 sc)

    Rnd 21: (2 sc in the next st, sc in the next 10 sts) repeat around (36 sc)

    Rnd 22: sc in each st around (36 sc)

    Rnd 23: (2 sc in the next st, sc in the next 11 sts) repeat around (39 sc)

    Rnd 24: sc in each st around (39 sc)

    Rnd 25: (2 sc in the next st, sc in the next 12 sts) repeat around (42 sc)

    Rnd 26: sc in each st around (42 sc)

    Rnd 27: (2 sc in the next st, sc in the next 13 sts) repeat around (45 sc)

    Rnd 28: sc in each st around (45 sc)

    Rnd 29: (2 sc in the next st, sc in the next 14 sts) repeat around (48 sc)

    Rnd 30: sc in each st around (48 sc)

    Rnd 31: (2 sc in the next st, sc in the next 15 sts) repeat around (51 sc)

    Rnd 32: sc in each st around (51 sc)

    Rnd 33: (2 sc in the next st, sc in the next 16 sts) repeat around (54 sc)

    Rnd 34: sc in each st around (54 sc)

    Rnd 35: (2 sc in the next st, sc in the next 17 sts) repeat around (57 sc)

    Rnd 36: sc in each st around (57 sc)

    Rnd 37: (2 sc in the next st, sc in the next 18 sts) repeat around (60 sc)

    Rnd 38: sc in each st around (60 sc)

    Rnd 39: (2 sc in the next st, sc in the next 19 sts) repeat around (63 sc)

    Rnd 40: sc in each st around (63 sc)

    Rnd 41: (2 sc in the next st, sc in the next 20 sts) repeat around (66 sc)

    Rnd 42: sc in each st around (66 sc)

    Rnd 43: (2 sc in the next st, sc in the next 21 sts) repeat around (69 sc)

    Rnd 44: sc in each st around (69 sc)

    Rnd 45: (2 sc in the next st, sc in the next 22 sts) repeat around (72 sc)

    Rnd 46: sc in each st around (72 sc)

    Fasten off.  Set aside for now.


    Tree Base:

    With green yarn, make a magic loop, ch 1;

    Rnd 1: 6 sc in the loop (6 sc)

    Pull on the tail end to tighten up the loop.  Put your safety pin or stitch marker in the first st you made in rnd 1 and move it up as you crochet to mark your rnds.

    Rnd 2: 2 sc in each st around (12 sc)

    Rnd 3: (2 sc in the next st, sc in the next st) repeat around (18 sc)

    Rnd 4: (2 sc in the next st, sc in the next 2 sts) repeat around (24 sc)

    Rnd 5: (2 sc in the next st, sc in the next 3 sts) repeat around (30 sc)

    Rnd 6: (2 sc in the next st, sc in the next 4 sts) repeat around (36 sc)

    Rnd 7: (2 sc in the next st, sc in the next 5 sts) repeat around (42 sc)

    Rnd 8: (2 sc in the next st, sc in the next 6 sts) repeat around (48 sc)

    Rnd 9: (2 sc in the next st, sc in the next 7 sts) repeat around (54 sc)

    Rnd 10: (2 sc in the next st, sc in the next 8 sts) repeat around (60 sc)

    Rnd 11: (2 sc in the next st, sc in the next 9 sts) repeat around (66 sc)

    Rnd 12: (2 sc in the next st, sc in the next 10 sts) repeat around (72 sc)

    Fasten off leaving a long tail to sew the base of the tree to the tree.


    Stuffing and Sewing:

    To begin, you will need to trace the base of your Christmas Tree to a thick piece of cardboard and cut it out.  You will eventually put this into the bottom of your tree so that the bottom of the tree will stay nice and flat.


    Next, start to stuff your tree.  Stuff it very firmly so that it is nice and tight.  After you have stuffed it, insert the round piece of cardboard into the bottom of the tree.


    Now you will need to start to whip stitch the tree base to the bottom of the tree.  You should have the same number of stitches on the base of your tree and the bottom of your tree.  They should fit together perfectly.  Stop when you only have a few inches left to sew and go ahead and add a little bit more stuffing to the bottom of your tree if you need to.


    Weave in your loose end, and you are done with the first part of your tree.  Now to add the leaves!


    Leaves:

    You will need to make 11 rings of leaves to cover this tree.  There are only 9 sizes listed below because you will make the smallest size (#1) 3 times and sew those to the very top of your tree.  Here is how each one will look. 


    The rings will get smaller and smaller as you crochet them.  We will be starting at the base of the tree with the largest leaf ring, and go up from there.  I will be numbering them #1 - #9 starting with #9 as the largest ring on the bottom of the tree.  If you are going to change color, start with the color you want the very bottom of the tree to be and change color for each leaf ring you make as you go up.  This tree would look beautiful made with one color too.

    #9:

    Ch 66, join with a sl st to the first ch to form a large ring;


    Rnd 1: ch 3 (counts as the first dc), dc in the next st, ch 1, {(skip the next st, dc in the next 2 sts, ch 1)} repeat from {( to )} around, join with a sl st to the first dc (44 dc, 22 ch-1 spaces)

    Rnd 2: work beginning crocodile stitch (see SPECIAL STITCHES section), {(sc in the space between the next 2 dc, work your next crocodile stitch (see SPECIAL STITCHES section) around the post's of the next 2 dc)} repeat from {( to )} around, sc in the space between the next 2 dc, sl st to the first dc you made to join (11 crocodile stitches)

    Fasten off, leaving a long tail to sew the leaf ring to the tree.

    Chances are that your leaf ring should fit perfect.  But, if by chance it doesn't, you will need to make a few adjustments.  You will need to try your ring onto your Christmas tree and make sure it slips clear down to the bottom of the tree as shown:


    If it is too tight, you will need to move up a crochet hook size and re-make it.  If it is too big, you will need to move down a crochet hook size and re-make it.  As soon as you get that first one to fit properly, the rest of the leaf rings should fit perfectly.

    #8:

    Ch 60, join with a sl st to the first ch to form a large ring;

    Rnd 1: ch 3 (counts as the first dc), dc in the next st, ch 1, {(skip the next st, dc in the next 2 sts, ch 1)} repeat from {( to )} around, join with a sl st to the first dc (40 dc, 20 ch-1 spaces)

    Rnd 2: work beginning crocodile stitch (see SPECIAL STITCHES section), {(sc in the space between the next 2 dc, work your next crocodile stitch (see SPECIAL STITCHES section) around the post's of the next 2 dc)} repeat from {( to )} around, sc in the space between the next 2 dc, sl st to the first dc you made to join (10 crocodile stitches)

    Fasten off, leaving a long tail to sew the leaf ring to the tree.

    #7:

    Ch 54, join with a sl st to the first ch to form a large ring;

    Rnd 1: ch 3 (counts as the first dc), dc in the next st, ch 1, {(skip the next st, dc in the next 2 sts, ch 1)} repeat from {( to )} around, join with a sl st to the first dc (36 dc, 18 ch-1 spaces)

    Rnd 2: work beginning crocodile stitch (see SPECIAL STITCHES section), {(sc in the space between the next 2 dc, work your next crocodile stitch (see SPECIAL STITCHES section) around the post's of the next 2 dc)} repeat from {( to )} around, sc in the space between the next 2 dc, sl st to the first dc you made to join (9 crocodile stitches)

    Fasten off, leaving a long tail to sew the leaf ring to the tree.

    #6:

    Ch 48, join with a sl st to the first ch to form a large ring;

    Rnd 1: ch 3 (counts as the first dc), dc in the next st, ch 1, {(skip the next st, dc in the next 2 sts, ch 1)} repeat from {( to )} around, join with a sl st to the first dc (32 dc, 16 ch-1 spaces)

    Rnd 2: work beginning crocodile stitch (see SPECIAL STITCHES section), {(sc in the space between the next 2 dc, work your next crocodile stitch (see SPECIAL STITCHES section) around the post's of the next 2 dc)} repeat from {( to )} around, sc in the space between the next 2 dc, sl st to the first dc you made to join (8 crocodile stitches)

    Fasten off, leaving a long tail to sew the leaf ring to the tree.

    #5:

    Ch 42, join with a sl st to the first ch to form a large ring;

    Rnd 1: ch 3 (counts as the first dc), dc in the next st, ch 1, {(skip the next st, dc in the next 2 sts, ch 1)} repeat from {( to )} around, join with a sl st to the first dc (28 dc, 14 ch-1 spaces)

    Rnd 2: work beginning crocodile stitch (see SPECIAL STITCHES section), {(sc in the space between the next 2 dc, work your next crocodile stitch (see SPECIAL STITCHES section) around the post's of the next 2 dc)} repeat from {( to )} around, sc in the space between the next 2 dc, sl st to the first dc you made to join (7 crocodile stitches)

    Fasten off, leaving a long tail to sew the leaf ring to the tree.

    #4:

    Ch 36, join with a sl st to the first ch to form a large ring;

    Rnd 1: ch 3 (counts as the first dc), dc in the next st, ch 1, {(skip the next st, dc in the next 2 sts, ch 1)} repeat from {( to )} around, join with a sl st to the first dc (24 dc, 12 ch-1 spaces)

    Rnd 2: work beginning crocodile stitch (see SPECIAL STITCHES section), {(sc in the space between the next 2 dc, work your next crocodile stitch (see SPECIAL STITCHES section) around the post's of the next 2 dc)} repeat from {( to )} around, sc in the space between the next 2 dc, sl st to the first dc you made to join (6 crocodile stitches)

    Fasten off, leaving a long tail to sew the leaf ring to the tree.

    #3:

    Ch 30, join with a sl st to the first ch to form a large ring;

    Rnd 1: ch 3 (counts as the first dc), dc in the next st, ch 1, {(skip the next st, dc in the next 2 sts, ch 1)} repeat from {( to )} around, join with a sl st to the first dc (20 dc, 10 ch-1 spaces)

    Rnd 2: work beginning crocodile stitch (see SPECIAL STITCHES section), {(sc in the space between the next 2 dc, work your next crocodile stitch (see SPECIAL STITCHES section) around the post's of the next 2 dc)} repeat from {( to )} around, sc in the space between the next 2 dc, sl st to the first dc you made to join (4 crocodile stitches)

    Fasten off, leaving a long tail to sew the leaf ring to the tree.

    #2:

    Ch 24, join with a sl st to the first ch to form a large ring;

    Rnd 1: ch 3 (counts as the first dc), dc in the next st, ch 1, {(skip the next st, dc in the next 2 sts, ch 1)} repeat from {( to )} around, join with a sl st to the first dc (16 dc, 8 ch-1 spaces)

    Rnd 2: work beginning crocodile stitch (see SPECIAL STITCHES section), {(sc in the space between the next 2 dc, work your next crocodile stitch (see SPECIAL STITCHES section) around the post's of the next 2 dc)} repeat from {( to )} around, sc in the space between the next 2 dc, sl st to the first dc you made to join (4 crocodile stitches)

    Fasten off, leaving a long tail to sew the leaf ring to the tree.

    #1:

    Make 3 of these for the very top of your tree.
     
     
    Ch 18, join with a sl st to the first ch to form a large ring;

    Rnd 1: ch 3 (counts as the first dc), dc in the next st, ch 1, {(skip the next st, dc in the next 2 sts, ch 1)} repeat from {( to )} around, join with a sl st to the first dc (12 dc, 6 ch-1 spaces)

    Rnd 2: work beginning crocodile stitch (see SPECIAL STITCHES section), {(sc in the space between the next 2 dc, work your next crocodile stitch (see SPECIAL STITCHES section) around the post's of the next 2 dc)} repeat from {( to )} around, sc in the space between the next 2 dc, sl st to the first dc you made to join (3 crocodile stitches)

    Fasten off, leaving a long tail to sew the leaf ring to the tree.

    Sewing the Leaf Rings to the Tree:

    Start by sewing the largest leaf ring (#9) to the bottom of the tree.


    Next, sew the next leaf ring to the tree (#8), and then the next (#7) ect.... until you have all of the leaf rings sewn to the tree.


    Star:

    With yellow yarn make a magic loop, ch 1;

    Rnd 1: 5 sc in the loop, pull on the tail end to tighten up the loop, join with a sl st to the first sc (5 sc)

    Rnd 2: (ch 3, sl st in the 2nd from the hook, sc in the next ch, sl st in the next sc from rnd 1) repeat from ( to ) 4 more times.  Fasten off leaving a long tail to sew the star to the top of the tree.


    Sew the star to the top of the tree, and you are finished!  Decorate your tree as desired, or leave it as it is. 

    Have fun making your Christmas trees everyone!  Merry Christmas!

    thumbnail

    Móc mẫu cây thông dẹt ( dùng trong trang trí thiệp, tranh)

    Nguồn http://uniquelyuk.blogspot.co.uk/2013/11/free-tutorial-to-make-knitted-cable-tree.html

    Free Tutorial - To make a knitted cable tree


    This is a small knitting project for someone just embarking on learning the art of cabling. It uses up odd balls of yarn too, so no buying yarn purposely.

    I made this tree using yarns in autumnal colours as I can’t believe winter / Christmas is nearly with us (only 1 month to go!), but for you I suggest using colours to compliment your home Christmas decorations.


    For this project you will need:

    3 small balls of left over yarn  pieces. I used DK yarn.

    1 pair of appropriate size needles for the yarn. I used 4mm needles.

    Crochet hook

    Large eyed needle, scissors, pins


     Instructions

    Step 1: With each ball of yarn follow the instructions below for knitting a cable triangle
    Cast on 25 stitches

    Row 1    K2, (P1, K4 ) x 4 times , P1, K2

    Row 2    P1, P2 together, *Purl to the last 3 stitches , P2 together , P1. * Please knit the knit stitches as you see them.

    Row 3    K1, (P1, CB4) x 4 times, P1, K1
    Row 4    As Row 2
    Row 5    (P1, K4) x 4 times , P1
    Row 6    As Row 2
    Row 7    CB4, (P1, CB4) x 2 times, P1 , CB4
    Row 8    As Row 2
    Row 9    K3, (P1, K4) x 2 times, P1 , K3
    Row 10  As Row 2
    Row 11  K2, (P1, CB4) x 2 times, P1 , K2
    Row 12  As Row 2
    Row 13  K1, (P1, K4) x 2 times, P1 , K1
    Row 14  As Row 2
    Row 15  (P1, CB4) x 2 times, P1
    Row 16  As Row 2
    Row 17  K4, P1 , K4
    Row 18  As Row 2  (7 stitches left in needle)
    Row 19  K1, K2 together, P1 , K2 together, K1
    Row 20  P1,P3 together , P1

    Thread yarn through remaining 3 stitches and make secure. Leave a long end


    Key
    K1 Knit one stitch

    P1 Purl one stitch

    CB4 Hold 2 stitches to the back of the 
    work on a cable needle, Knit 2 stitches, then
     knit the 2 stitches from the cable
     needle

     
    Here is a photograph of the three cable triangles that I made with the spare yarn I decided to use.
    As you can see, even though I used the same needles and the same number of stitches I finish with 1 of the triangles obviously bigger than the others.
    This does not matter, simply use the bigger triangles at the bottom of the tree.


    Step 2: Knit the tree trunk

    Cast on 10 stitches
     Knit 10 rows
    Cast off


    Step 3: Position the 3 triangles on top of each other to give you the tree shape, pin in place. 

    Step 4: Turn the knitted trunk on to its side and pin in place at the bottom of the tree.


    Step 5 : Turn the tree over so you are working on the back of the piece of work. Sew all pieces together without showing any of your stitches at the front of the tree.


    Step 6: Take the long length at the top of the top triangle and using the crochet hook, crochet a chain , fasten the other end in place on the tree to form a loop for hanging

    Step 7: Sew a line of stitches at the bottom of each triangle in one of the contrasting colours.

    You can hang these little cable trees anywhere I have knitted mine in autumnal colours and the tree is now hanging in my rustic kitchen.

    You can use this design to knit cable trees in lovely Christmas colours, try red , purple and gold for an opulent look or green , red and silver for a more traditional tree. These would look great hanging on the main Christmas tree or hanging on children’s cupboard doors to remind them that Christmas is on its way.
    Remember, if you make any of these lovely trees , then send photos to Uniquely UK and we will feature them on facebook or in our blog (or both).

    Please feel to make as many of these as you like for personal use, but I would ask that you don't sell the finished items. Please do not reproduce any or all of the tutorial, without linking back to here.

    This tutorial has been designed and written by Sandra of TheFeminineTouch. If you have any problems with understanding the written instructions then please contact her via the web site. 
    Please view her lovely feminine knitted work here on the web site.

    About

    Được tạo bởi Blogger.